Thursday, June 21, 2012

Giraffe Inspired Look. ღ

Haii! This past weekend, I visited the zoo/refuge & it was so neat. I hadn't been in a long time & it was awesome to see all the beautiful animals. One of my favorites, were the giraffes! They were gorgeous & seemed friendly. Haha. They came as close to us as they could & stared at us. I wanted to make a makeup look inspired by them & here's what I came up with.

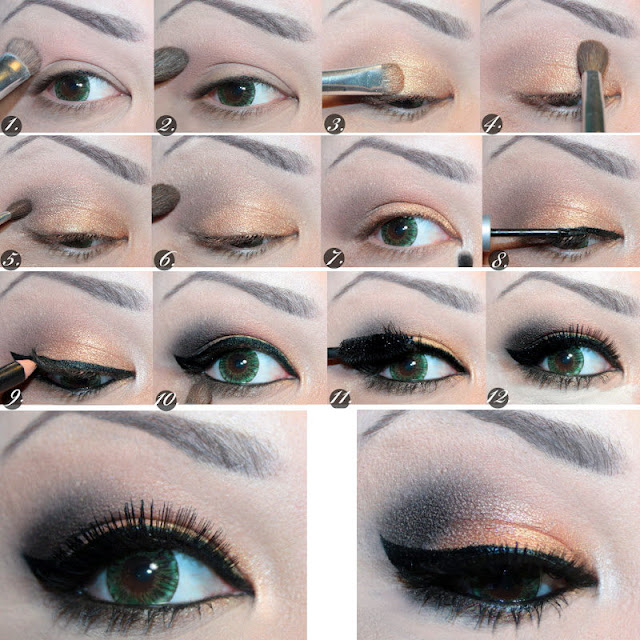
Eyes.
 

1.) Highlight & Transition: I used a matte flesh tone color as my highlight & then an orangy color in the crease. (Wet N Wild's I♥Matte palette)
2.) Crease: To define the crease more, I used a color darker in my crease & blended out the edges. (Naked from the Urban Decay Naked Palette)
3.) Golden Lid: I then placed a gold color all over the eyelid. (Half Baked from the Naked Palette)
4.) Blend: Taking a shimmery pinkish color on a fluffy brush, I then blended out the inner-mid crease. (Toasted from the Naked Palette)
5.) Outer Crease: I took a dark shimmery brown & placed it in the outer eye. (Darkhorse from the Naked Palette)
6.) Blend: Blend it the edges & where the other shadows meet.
7.) Inner Eye: With a pencil brush, I dabbed a shimmery light shadow in the inner tear duct area. (Virgin from the Naked Palette)
8.) Liquid Line: With a black liquid liner, I lined my top lid, with a dramatic winged eyeliner. (Wet N Wild Water Proof Liquid Liner)
9.) Pencil Line: With a black pencil liner, I tightlined the top & my waterline. (Wet N Wild Pencil Eyeliner in Black)
10.) Define: I used a dark grey color to define & darken the outer eye. I mixed the shimmery brown & the dark gray color into the lower lash line. (Darkhorse & Creep from the Naked Palette)
11.) Lashes: To finish off the look, I applied a black mascara on my top & bottom lashes & then applied some short but full falsies. (Mabelline The Colossal & Ardell Lashes in 101 Black)
12.) Conceal: As a finishing touch,, I then conceal under my eyes & set with a powder.  (Hard Candy Glamoflauge Concealer in Light & Wet N Wild Natural Blend Powder in Bare)


Lips.
[L] Wearing Reel Sexy only [R] Pucker Up Gloss over Reel Sexy
MAC Reel Sexy • Sinful Colors Pucker Up: I loooove this lipcolor combo! I really like the orangy-pink lipstick alone but love it with this gloss too. The gloss is more of a milky pink but it looks prettier than I expected with this lipstick. It's bright, fun & a great Summer color. I'm usually a pink lip kind of person lol but I've been trying different colors lately & I'm loving it. Corals & oranges have been my favorite!


Nails.
Sinful Colors in Vacation Time: This is literally my third attempt at giraffe print nails lol. My first attempt reminded me of banana pops & chocolate lol. My second, I did a sparkly lavender background with a too-bright orange pattern on it. I didn't even bother to take pictures of it, it was so bad lol! This was the only one I was pleased with lol. I hope you enjoyed the nails & the makeup look! Thanks so much for stopping by. xOxO

Tuesday, June 12, 2012

Easy DuoChrome Eyes. ღ

 Hi, today I'm doing things a tad bit different. I've been asked to do makeup tutorials by some girls. I've never given it serious thought because unlike real makeup artists, I don't really have too much of a technique. I only know my face & I've come to learn what works for me & what doesn't. For example,  you know how they say black liner on the waterline makes your eyes look smaller? Wrong for me. That actually brings more attention to my eyes & makes them stand out more. You know how they say to apply blush to the apples of your cheeks? That actually kind of ages me & makes my face look wider. I've found that applying it right above, where the contour would be & not extending the blush past my eyes works a lot better for me. I realize that what works for me, doesn't work for everyone else but I don't want some of you to think I'm ignoring your requests lol So I tried to think of a simple version of my favorite eye makeup. Emphasis on the word simple! I didn't want it to be a look that's super hard to follow. I used a duochrome because it makes it look like you're wearing more colors than you actually are; giving your eyes more dimension that a single color shadow would. I tried to use products that almost everyone who reads this blog already has anyway, or has something pretty similar.


1.) Prep Lids: Use your choice of primer or base.. or both. I rarely use primer. I don't really see any benefits to using it for myself. What I do, is dab a very small amount of foundation & blended it all over my lid & set it with powder. (Revlon Colorstay Foundation in Sand Beige & Wet N Wild Natural Blend Powder in Bare)
2.) Blending color: I take a color a shade darker than my skintone & brush it into & above the crease. The purpose of this is to make the eyelid color in step 4, easier to blend out. (Light orangy color from Wet N Wild IMatte)
3.) Highlight: I then highlight under my brow. I like to keep the highlight only where the brow arches. I then blend together where the highlight & the blending color meet. (White color from Wet N Wild IMatte)
4.) Eyelid: With a dense shadow brush, I applied a duochrome. I didn't bring the color up past the crease. (Right bottom color in Wet N Wild's Comfort Zone)
5.) Blend: With a fluffy blending brush, I blended out along the crease. Bringing both, the lid color & the crease color together.
6.) Dimension: To add even more dimension & some added color, I patted some blue shadow onto the center of the eyelid only. (Mid-right color in Wet N Wild's Blue Had Me a Hello)
7.) Top Liner: I lined the top lid with a liquid black liner & created a slightly thick wing. (Wet N Wild Water Proof Liquid Liner)
8.) Mascara +Falsies: I then gave my nonexistent lashes two coats of black mascara. Then applied some criss cross lashes. In the picture, I also applied mascara to the bottom lashes in this step. But I recommend not doing that until after step 10. Since we will be adding shadow to the lower lash line. (Mabelline The Colossal & Glama Lashes in XO)
9.) Tight Line: Then I took a black pencil liner & lined the upper rim of my eye & then did the same to the waterline. Tight lining gives the illusion of thicker top lashes. (Wet N Wild Pencil Eyeliner in Black)
10.) Lash Line Shadow: Taking a pencil brush, I applied the same all over lid color along the lower outer lash line. After this or after step 11, would be a good point to apply mascara to the lower lashes. (Right bottom color in Wet N Wild's Comfort Zone)
11.) Finishing Touches: All that was left to do was to brush away any fall out with a big face brush & conceal. I usually like to conceal with a foundation brush but also use my fingers from time to time. After I blended in the concealer under my eyes, I then set it with my face powder. (Hard Candy Glamoflauge Concealer in Light & Wet N Wild Natural Blend Powder in Bare)


[Wet N Wild 8 Color Palettes] Comfort Zone • IMatte • Blue Had Me At Hello

Lilac Castle
NYX Castle: Okay, I hope I don't lose you on the lips lol. It's a frosty muted purple, (I sense that I've lost most of you now) It comes off as an iridescent lilac on the lips. It's absolutely gorgeous & even though these round NYX lipsticks don't have virtually any lasting power, I still love the colors. This past week, I wore Castle like three times which is cray for me because I usually stick to my Prim Rose & my Tea Rose.. Oh! What a coinkeedink they both have rose in them! lol Anyway, it's not super bold so I really like the way it looks with dark eye makeup. The other time I wore it, I wore it with a dark brown smokey eye, which looked really nice. I rarely go outside the box, but this color is pretty nice! We shan't be afraid of different colors, we shan't.


This was a different direction but really fun. They probably won't come as often, but I'm hoping to do a few more of these in the future. I should note that my desktop is officially out of commission, & I'm not so much use to the screen colors on my laptop. But I will definitely try to either adjust or get a new desktop. If you enjoyed this post, & you're craving great in-depth tutorials (pics) I strongly recommend following this little lady.. ibeauty She does really great makeup & shows exactly how she did it. If your thang is instagram, & you enjoy daily fotd's, I strongly reccommend following janet84 on Instagram. She does really pretty makeup & posts it daily, she's incredibly sweet & if you have a question, she's really good at getting back to you. I'm extremely excited for this week! I'm taking my family to the zoo & the beach this weekend & I'm beyond ready for this! Lol this week will consist of shopping for the crazy heat that will surely be more than happy to greet us. lol Have a great week! & As always thanks so much for stopping by. <3

Sunday, June 3, 2012

I'm Fifty Shades of Make-Up.

I had seen tons of posts on Instagram about this trilogy one day & then Wifezilla posted that she had gotten it too. I took it as a sign lol & looked for the books. I went through the first two in like 4 days lol. I started reading the third book..hmm maybe a week ago. But it's not as good as the second book was for me. So I put it down for awhile.  But here's my 50 Shades makeup look! I incorporated a lot of gray to represent Mr. Grey & just a little bit of Anastasia for the lips. I hope you enjoy the makeup! We aim to please.


Smoldering Gray Eyes.
ELF Studio Endless Eyes Pro Mini Eyeshadow Palette : In the book, Christian Grey's eyes are described in great detail.. "blazing, smoldering, gray eyes" are what I took away for inspiration. I've had this palette for too long & have rarely put it to use. I was looking for grays & picked up this palette because it seemed to have a good range of that color. I'm so glad I did! I loved the colors & although, the shadows are a bit chunky & not super easy to blend. I still really like them. It's very nice to be able to use one palette for an eye look. For my highlight though, I used Wet N Wild's IMatte palette. But that's just the highlight, so not bad right? Haha. The eyelashes are Glama Lashes in the style "xo".


Don't bite your lip, Ms. Steele.
 
[L] Prim Rose only [R] Fashion Scoop over Prim Rose
Revlon Prim Rose • MAC Fashion Scoop c/s glass : The eyes were all about Mr. Grey & the lips are all about Anastasia. She's young & innocent & bites her lip a lot? lol I wanted a soft baby pink color to show all those things. It's also not super obvious or bold. Anastasia's not the type to really wear makeup anyway. Which, by the way, was one of the most frustrating things for me about the book. The books are written from her point of view, & most of the time, I just could not relate to her & did some eye rolling of my own.

Playroom Studded Nails.
I continued the gray theme with the nails too. Can you believe I didn't have a gray polish? I have silvers but no grays. I used an old white nail polish & poured in a little bit of basic black nail polish. This is my end result! I really like the shade of gray I ended up with. I wanted to incorporate the playroom & the darker side of the book. Since I couldn't figure out how to add floggers to my nails lol I decided to stud them out. I think it gives them the edge, I was looking for.


Thanks so much for stopping by! 
If you haven't read the books, some of my commentary probably made no sense lol but thanks for sticking around anyway! I hope you enjoyed the makeup. Have a great week!!
Laters, Baby.


Obsessed ღ : Lipstick Necklace +Bow.


My amazing piece of hunk, of a boyfriend got me a little somethang. I was looking at accessories with lipsticks & makeup related jewelry online, some days ago. Then I saw the mother of all necklaces.. A lipstick encrusted with beautiful sparkly rhinestones. Glorious!! My bf ordered it & gave it to me as a gift. Awww! I got it yesterday & I feel like wearing it with everything! It's so beautiful & my first compliment on it came from my 4 year old little cousin. Lol she made a b-line to me when she spotted it! It was so cute. Everything in this post is from elessajade.com.


She said she loved my name. d'aww! She's so sweet! I didn't know this but that's PurseBuzz yall!
Dark Silver Adjustable Bow Ring with Black Rhinestone Detail.
Xtra Large Crystal Lipstick with Bow in Pink.
I freakin love it!! Thank you, baby !

Tomorrow I will be posting my 50 Shades of Grey Inspired makeup look.
Eeeep! I'm so excited about that one! I've been reading the books like a mad woman, thanks to Ms. Wifezilla!
I'm on the Freed book now. Please check back tomorrow evening, if you're interested in seeing that! xOxO
In the meantime, thank you so much for reading! xx

MAC Reel Sexy Haul + Winnings. Yay!

Hey ladies! Here's a blast from the not-so-distant past. Haha I think it's time this baby gets posted. I always have a story behind a collection but, yikes.. I don't even remember what was going on two months ago. v.v I do regret not getting Pink Popcorn from this collection. The homita Nessa lol picked it up & blogged about it here & it looks so pretty. Moving right along though, let's get into it!


MAC Lightscapade Mineralize Skin Finish: Mine didn't have a whole lot of blue veining but it's still pretty gorgeous. I use it to highlight the cheekbone area. I'm not even a huge fan of all that but once in awhile it's pretty awesome. I like the subtle effect this leaves on my face. It's really smooth & blends in really nicely. I have nothing bad to say about this product, other than it's overpriced lol.

MAC Reel Sexy: Love this color!! It's a bit light on me but I love the orangey peach tint it has to it. I've been using this a lot for summer so far. This one & Revlon's Prim Rose are probably my most used this past month. I've been keeping the eye makeup to a minimal & the lips, for the most part, to a minimal too. The only thing really bold, I've been rocking is winged black liner & big dark lashes. My boyfriend got me a backup of this lipstick. Which worked out perfectly, I had no idea I was going to love it so much!

MAC Heroine: THIS was my most anticipated piece of this collection! I couldn't wait to see this one in person & even though it's.. purple & pretty dark on me. I really like it a lot. When I first took it out the tube, it intimidated me lol I thought "Ohhh I'm going to hate it!" Don't get me wrong. It's still kind of funky looking. lol But it works for me.. it's fun. It's an interesting shade, to say the least.

MAC Watch Me Simmer: I picked up this one back with the Shop/Cook collection but since it made a comeback in the Reel Sexy collection I decided to include it too! This is a really nice orangy pink, almost? I find that, like most orangey lipsticks.. it doesn't always look too great on me though. Haha.

MAC Screening Room Nail Lacquer: This polish was soooo hard to photograph. The picture looks a little grainy because I messed with the brightness & contrast to try to get it to look as close as the real thing as I could but blegh. For some reason, it shows a lot darker than it really is on my camera. Anyway, I tried to swatch it but that turned out worse lol I will try to include in it a notd, if I can get it show up well. Now the color, is really nice. I thought it would be more teal-ish but it's almost on the forest greens side. It's really nice though & different than the nail colors I'm use to.


For Funsies..
Crystal Stickers: These little suckers are so cute. I recently did this to my laptop because I felt it was girly enough lol. I got these little packets of crystals from a dollar store. I used up 4 little packs & it's not as tedious as it looks. They come in strips! So all you have to do is peel off the strips & line them on as straight as possible. It doesn't take long at all & it looks so pretty once it's done!


I won Monica's birthday giveaway!
LA Colors AD Baby Pink • Sinful Colors Bare • Sinful Colors Mint Apple • Sinful Colors Cinderella • Nabi Multi Star Glitter • LA Colors AD Silver
LA Colors Trios: Tiki Punch, Moon Rock, & Shooting Star
Nail Buffer • Five Double Ended Dotting Tools • Pink Glass File
Great prizes, right?! The nail file is glass & it's amazing! I've never had a glass nail file before. It's so cool, I love it. The dotting tools are so much fun to use. They come in all sizes & really do make a difference in how easily you can create designs. I love them!! The nail polishes are beautiful! I especially love Cinderella & the Multi Star Glitter. It's so pretty. & I finally have Tiki Punch!! Yayy! lol Thank you so much again, for the great giveaway, Monica! xx
 

LinkWithin

Related Posts Plugin for WordPress, Blogger...