Showing posts with label Angelic Wink Lashes. Show all posts

Tuesday, September 25, 2012

Instagram Makeup ♥

Instagram has become the easiest & most convenient way to share makeup pics for me. Blogging is still fun though! The beauty of blogging is that you can go into as much detail as you want! But over the past few weeks, I've been sharing makeup pics on Instagram like cray! Below are some of my favorites! I'll include a list of the products I used for each picture. Also, for some of the IG pictures, the filter was too overpowering so I posted the pre-filtered version for some of them. Enjoy!!


The last one is my latest & my favorite! Thanks so much for checking it out. Again, if we don't already follow each other on Instagram, well then.. let;s!! I get a lot of spam followers.. you know the kind that follow a kagillion people. So let me know that you're real & I'll follow back. (@ me, So I know it's REAL! lol) Have a great week everyone!! xOxO


instagram: @dinorahbaby
 

Sunday, July 15, 2012

Date Night Makeup ♥

Haii! Well, if we follow each other on IG, you might have seen my blue makeup from Tuesday. Well, I went ahead & made a mini tutorial/pictorial for it, since it's pretty much the style I've been wearing recently for the nights out with the Bae! Even though 99.9% of the time, we're homebodies.. it's fun to dress up & go out once in awhile. A night out screams smokey eye, doesn't it? As a fan of the smokey eye & bold colors, this look is very near to my heart. & Like all my makeup lol it's super simple to do. So in the wise words of Montel Jordan, This is how we doooo ittt!

1.) Prep: Ready your lids for the shadows! What I did is I took a dot of foundation all over my lid, set it with face powder, & then placed my usual medium flesh tone in the crease. I also added my matte white highlight (lightly). (Light Orangy Color & White from Wet N Wild I♥Matte palette)
2.) Lids: I then used this shimmery blue all over the lids & slightly blended out the edges with a fluffy brush. (Wet N Wild Blue Had Me a Hello)
3/4.) Crease: With a light hand I grabbed a matte black & mixed it with a dark brown, very lightly & placed it in the crease. I just noticed, as I was typing this, that these two steps were the same lol sorry. (Wet N Wild's Blue Had Me a Hello & brown color from Wet N Wild I♥Matte palette)
5.) Blend: Blend out the edges of the crease color & if you have to go back with the transition color to tone down the dark blending, you can do so! I did, you can see the difference in step six.
6.) Bottom: With a flat brush, I took the blue eyelid color along the whole lower lash line. (Wet N Wild Blue Had Me a Hello)
7.) Tightline: With a black pencil eyeliner, I tightlined the top & bottom of my eyes. (Wet N Wild Pencil Eyeliner in Black)
8.) Liner: I went in with a black liquid liner on top & winged it out a bit. (Wet N Wild Water Proof Liquid Liner)
9.) Mascara: I did two coats of black mascara on my top & bottom lashes. (Mabelline The Colossal)
10.) Lashes: I then took some full, soft, black falsies & applied them to the top. (KleanColor Angelic Wink Lashes in the style "Deviant Yuri")
11.) Light: I went back in with a sponge applicator & applied a white irridescent shadow to my tear duct. (Wet N Wild Blue Had Me a Hello)

Moonlit Eyes


Kiss Goodnight
MAC Dress It up Lipcreme & MAC Fashion Scoop Creemsheen Glass: Since the eye makeup is pretty bold & most girls don't want the look to be super overwhelming (I'm not one of those girls lol), especially for a date, I went for a light pink lip. A nude lip would look amazing, but I wanted to add at least a teensy bit of color on the lips.


Starry Glam Nails
LA Colors Intimate • LA Colors Black • Wet N Wild Kaleidoscope
I loveee these nails!! They're flashy but so incredibly easy to do. That's the power of glitter, right? I saw this design here & wanted to recreate it. These would be perfect for a night out of the town. They're just the perfect amount of sparkly & you don't have to worry about being absolutely perfect with the application. The three easy steps are base color (fleshy nailpolish), tips (black nailpolish, don't have to be perfectly lined) & finally the silver glitter! Which is concentrated on the center of the nail. Simple right?! I love it!

______________________________________________________________


I also wanted to include some pictures of some of my beautiful, fellow makeup lovers that have recreated some of the tuts!  I was so excited that they did! & I love them & how they turned out! ♥ Thank you both ladies for posting these!!


 DuoChrome Tutorial

 Priscilla from MakeupJunkie88 was amazing enough to recreate my very first mini look. Beautiful! I do believe she perfected the look. She's just beautiful! Thanks so much, doll! You can check her out here Instagram: mujunkie88


 Galaxy Tutorial
My beautiful, fellow Valley girl Elli did an inspired look from the Galaxy Look that I did exclusively for IG. I love that she did a bright pink lip!! It's gorgeous. If I'm not mistaken, I believe she told me she was wearing "Spellbound" by Covergirl. She's stunning, you can check her out on instagram: theregoes_elli


& Thank you so much for stopping by!
I hope everyone's enjoying the weekend! xOxO

Tuesday, July 3, 2012

The Little Mermaid Makeup.

"You've got to flutter your eyes like dees & you've got to pucker your lips like dees" I remember watching the Little Mermaid when I was five & six.. over & over.. & over again. I had a little tv/vcr sitting on my pink vanity, my parents had painted for me. It's my second favorite Disney princess movie, my first being Cinderella. The weird thing about the Little Mermaid for me, is that I didn't really watch it for Ariel. I watched it for Ursula. Ha! No lie, she's my favorite character in the movie. I still think she's the coolest villain ever. This look isn't supposed to be what Ariel's wearing.. cause that would just be red lipstick & some mascara maybe. This is more just putting all her colors as a mermaid, in one look. I hope you likes!


A-riel Life Mermaid
MAC Turquoise Glitter • MAC Push The Edge • Mabelline Colot Tattoo Painted Purple • UD Purple Haze
The first went over the lid with the purple Color Tattoo. The lid color over it, is Purple Haze. It looks kind of pink in the pictures, but it's more of a red-violet. I then took the blue-purple, Push The Edge, in the crease. With some glitter glue, I went along the botton lash line & then placed MAC's Turquoise glitter over it. These awesome lashes, that I'm absolutely inlove with, I recently picked up. They're from Klean Color's Angelic Wink lashes & they're in the style Smoking Erica. The makeup is simple yet really bold, because of the glitter.. which is always good, in my book.


You Wanna Kiss The Girl
Wet N Wild Stoplight Red [911D] • Mabelline Fuchsia Fever: I did the red lip because Ariel wears it in the movie & also because of her signature red hair. With a lipbrush, I dabbed some Fuchsia Fever along the center, of the top & bottom lips. I think it makes the typical red lip, not so typical!


Mermaid Tail Me Your Name
LA Colors Intimate (Body)
Wet N Wild On A Trip & Orly Charged Up (Seashells)
A Perfect 10 Sweet Thang (Mermaid Tail)
MAC Turquoise Glitter (Mermaid Tail)
Wet N Wild Jezebel (Red)

Awesome design right??! Well, the idea's not originally from me. The original nail design [found here], is a lot prettier! I saw it on wehearit & gaahh, that tail is amazing! I know it's not wearable, but what a fantastic nail art. I tried to make mine, (above) more wearable, but only because I couldn't figure out a way to add that amazing tail & make it look as flawless. Haha. So I did a pointy nail, instead. This was definitely my favorite part of this whole look. I also like how melon-like her body looks on my thumbs lol. Also, I cut the tips of my thumbs in the shape of a lazy "M" to do the seashell bra. I love this design so much!& I'm so proud of my word-play titles lol Me & my boyfriend came up with them lol.


Thank you so much for stopping by & checking it out.
For my fellow Americans, I hope you enjoy your 4th of July festivities! & For everyone, 
have a great week!!


Tuesday, May 1, 2012

Beauty Around The World: Paris♥


Who doesn't wish they were in The City of Love right about now! lol I've never been to the other side of the pond, but if I ever go someday.. I'd love to visit Paris. It's rich with style, history, & beautiful architecture. It's also one of the most expensive cities in the world.. but more importantly, (to me anyway) it's one of the most romantic cities in the world. I know there's more to Paris, than the Eiffel Tower, but  it's one of the first things I think about when Paris comes to mind.


Eyes Parisian Lights. 

[Sedona Lace Palette 88 Matte Palette] Refer to the image above to see the colors I used, and where I placed them.
[Pink/Light Purple Glitter] Applied under the inner lower lash line over a bit of clear lash glue. It's clearly not the safest thing to put anywhere near your eyes lol but I couldn't resist. I wanted to incorporate the city lights. I easily removed the glitter with a makeup remover wipe, right after pics.
[Angelic Wink - Catty Maria Lashes] I found these in a little novelty store recently & gawsh they're beautiful! They're so full & super soft. I went back a couple days later to stock up even though, I'm not one to spend $4 on a pair of lashes. Call me loca! But sadly, there weren't anymore. 


Lips Macaroon Pink. 
 
[NYX Narcissus] I thought this pink was pretty perfect for this look! I wanted to keep the look pretty bright & far from ordinary. This super bright pink, surprises me every time I wear it. The formula's not the longest lasting & as you can tell it's kind of streaky but the color is just WOW.


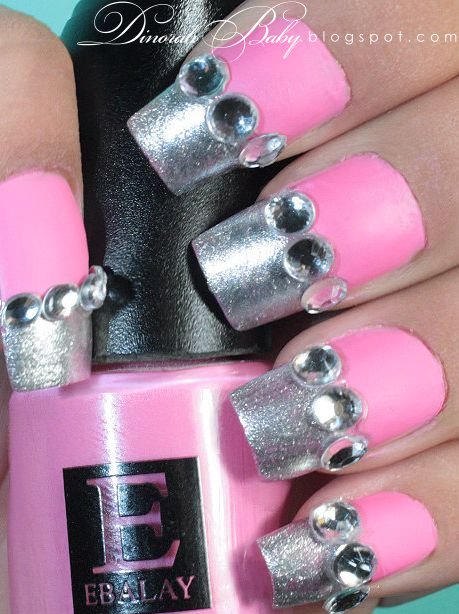
Nails Metallic French Tips.
 
A twist to the typical french tip manicure. I'll admit, I wasn't too crazy about this mani. I tend top play it safe when it comes to nails, but this time I went a bit outside of what I normally do.. & change it scary to me. lol

[EBALAY Baby Pink Matte] This color is beautiful! The sticker on the bottom says "Rose Water". It's a beautiful light baby pink with a matte finish. I got full coverage after 2 coats.. which is pretty standard/good. Both these polishes were sent to me by KKCenterHK & you can find additional info on this pink matter one, here.
[X&D Nail Art Polish in Litchi] This is a nail art polish with a fine brush. Now, I'm used to using the $1-$2 nail art polishes from the drugstores. I always find the brushes a bit difficult to use, for some reason. So I always end up using my own art brushes. This brush though, is amazing. It has great hand line control & it's really precise. I'm crazy about the metallic color too! I can already tell I'll be using this one a lot. I hardly ever say this but this one is def. worth the price tag. The pink one though, I don't think so. lol Additional info on this polish here.

You can't see the whole art brush effect in my Paris nails, so I did some random zebra strokes here to show ya'll!  


Hope you enjoyed the look! Thanks so much for stopping by & reading or even just looking at the pics. I appreciate it! Btw, I'm on Instagram now! Another way we can stalk each other! Yayy lol. Feel free to follow me! Have a great week, ya'll! xx

LinkWithin

Related Posts Plugin for WordPress, Blogger...